
|
SuperVerde!!! For those of your who read the SuperVerde page when it was at the oldebottles site, there have been some changes. I originally wrote the page as the car was being built. Now as I reload this page the car is done, puts out 228 rear wheel horsepower and has traveled 30,000 reliable miles. The text I wrote doesn't really make sense. So the page will have a mix of the old with quite a bit of new information. SuperVerde is now at the end of its development. There won't be any more improvements. We may bump the power up quite a bit more just to show that we can, but the current set up has more then enough power and we don't want to sacrifice reliability. Anyway, here is the page, the newest information will be at the bottom. Polyurethane Suspension Bushings: Upgrading to polyurethane suspension bushings is one of the most cost effective upgrades you can make to your GTV6 or Milano. The stock rubber bushings wear out fast especially with spirited driving. Polyurethane bushings don't wear out and they more accurately control suspension movement and location resulting in improved performance. This upgrade is the best place to start with suspension modifications. Your car will not be able to fully exploit other changes like stiff torsion bars or performance shocks with old worn out bushings.
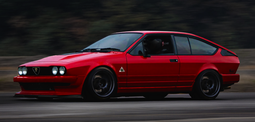
This is it! The new 1988 Verde, 145,000 miles, blown head gasket, very low ride height with 27.3mm torsion bars, stiff rear springs, special wheels with 215/45 tires and a lot more. Castor Rod Bushings From International Auto Parts (I.A.P.) The first suspension bushings to replace should be the castor rod bushings. The castor rod is the bar that connects the upper suspension arm (called an "upper link" in the official manual) to the chassis up near the front of the wheel well. This arm secures the upper link in the fore/aft direction and has a threaded collar on it for Castor adjustment. The bushings at the forward end of the arm take a lot of abuse and are the first bushings to wear out. In fact with spirited driving the stock bushings don't last long and should be changed frequently. Worn out castor rod bushings will cause a loss of steering precision, sloppy handling and can cause serious damage to the chassis which I will explain later. It's easy and inexpensive to change these to polyurethane bushings which will result in improved steering, and handling, plus they won't wear out. It's an inexpensive mod too, costing far less then a tank of fuel and it will probably save you money in reduced tire wear and fuel consumption due to a more consistent and accurate wheel alignment.
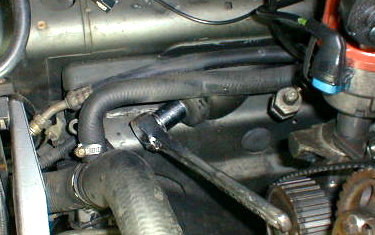
In this photo you can clearly see the castor rod. You can also see the rub marks from the big tires. This project is fairly easy and you will not need many tools. You will need a ratchet with sockets in 13mm, 17mm, and 19mm, a 17mm box or open end wrench, a flat head screw driver, pliers, a floor jack and jack stands and that's about it. You will need to start by jacking the car up and removing the right front wheel. At this point I need to talk about jacking the car up. Working on a jacked up car is dangerous, you could be injured or killed if you are not very careful. A brake disk falling on you with a 3000 pound car driving it can easily sever a limb. The car needs to be extra secure when doing suspension work because a lot of force will be needed to loosen various bolts and that could jostle the car enough to cause it to fall if it's not very secure. To make matters worse there are not a lot of jacking points on an Alfa or any other unit body car and on the Verde some of the jacking points are partially blocked by the plastic ground effects kit. It's quite easy to damage the car by improperly jacking it. I use a good floor jack and once the car is up I put a jackstand under it and throw the wheel under the car too just in case. If you have any doubts about how to jack up the car get help from a local Alfa expert. Ok, once the car is jacked up and the wheel is off you need to use your flat head screw driver to separate the main air intake hose from the airflow meter. Now unlatch the top of the air cleaner box and lift it out of the way, be careful not to damage the electrical wiring to the air flow meter. Look into the bottom section of the air cleaner box and locate the bolts holding it on. There are usually three 13mm bolts, remove them and lift the bottom of the air cleaner box out of the car. Once the air cleaner is out of the way you can see where the castor rod protrudes into the engine compartment. It has a 19mm nut on it, a large washer and of course a bushing we will be replacing. Use your ratchet to remove the 19mm nut. Now remove the washer and bushing. You will probably need to rotate the washer counter clockwise to get it off. It's not threaded from the factory but years of riding the threads on the castor rod will have worn grooves into the washer so you will find that it spins off very easily. Once these parts are off return to the wheel well area
Here you can see my 19mm socket and ratchet on the nut in the engine bay. This is located below the air cleaner assembly. Now in the wheel well we need to disconnect the castor rod from the upper link. It's attached by a 17mm bolt coming up through the bottom of the link and a 17mm nut on top. Some cars will have a cotter pin going through the bolt above the nut. If your car does get out your pliers and remove that pin. Get out your 17mm ratchet and box or open end wrench. Put the socket on the bolt on the bottom of the link. There is not much room for the socket and ratchet and you will not be able to turn it but that's OK you just need to hold it still. In some cases you will not have enough room to get to the bolt. If that's the case use your 13mm wrench to disconnect the shock from the lower suspension arm and move it out of the way. Now use your 17mm box/open end wrench to loosen and remove the nut on top. Once the nut is off strike the bolt with your ratchet and it will fall down. Get the nut and bolt then pull the castor rod toward the rear of the car and lift it out. One the castor rod is out remove the remaining bushing and washer. Not that the washer and bushing on the wheel well side DO NOT interchange with the washer and bushing from the engine bay side. Take a good look at the washers, they may be bent and deformed, that's no big deal however since they are out of the car you should fix them. Simply put them on a flat surface, like the concrete floor of a garage and smash them flat again with a sledge hammer. Now with a wire brush clean up the castor rod, especially the threaded areas.
Here is a cleaned up castor rod with two new bushings from I.A.P. Now it's time to put it all back together with the new bushings from I.A.P. I used the I.A.P. polyurethane bushings which are an excellent design. The kit comes with 4 bushings and 2 metal sleeves plus a pack of lubricant. The design of the bushing is excellent. It has a beveled edge on the washer side of the bushing as well as a reduced overall diameter when compared with the stock bushing. This is clever because it reduces the twisting force applied from the bushings to the chassis that occurs with suspension movement while allowing use of a stiff bushing to locate the arm solidly. These bushings also fit better then others I have used and are truly a superior product. Putting this back together is simple. Put the rear washer (the one with the bigger hole) onto the castor rod. Next grab the bushing with the protrusion and coat both sides of it and the inside of its hole with lube. Now insert the metal sleeve into the bushing and slip it onto the castor rod. It needs to go on with the protrusion side forward since that will fit into the hole in the chassis. Now shove it into the hole in the chassis making sure it seats properly in the hole.
This is the hole where the Castor Rod mounts in the chassis. This one is in good shape but that's not always the case. If the bushings are worn out they allow the rod to contact the chassis which causes the hole to become enlarged into an oval shape. This is expensive to fix so don't drive the car with worn out Castor Rod bushings. Also the stock bushings are made from a very porous rubber which traps water promoting rust. The polyurethane bushings eliminate both of these problems. The next step is to attach the Castor Rod to the upper link. to do this put the 17mm bolt back in through the bottom of the link. You will find that it will not line up with the hole in the Castor Rod but that's not a problem. Grab the brake caliper and pull it back and you will find you can move the upper link around enough to line the bolt up with the hole. Now put the nut back on and tighten it up and insert the cotter pin. If you car does not have a cotter pin then I suggest you use a NEW nylock nut and liquid thread lock. If you unbolted the shock earlier bolt it back in place. Now return to the engine bay and take a good look at the castor rod. You should see the bushing from the wheel well side protruding through the hole. If not go back to the wheel well and move the castor rod around until the bushing seats properly. Now put lube on the other bushing and slide it onto the Castor Rod on the wheel well side. The recessed area of that bushing should seat nicely into the protruding section of the other bushing. Now put the big washer back on, you may need to spin it clockwise. Now secure it with a NEW nylock nut and liquid thread lock. If you don't it WILL back off. As an alternative method you could use a double nut like the factory did on the GTV6's shock mounts and rear sway bar mounts. Put the air cleaner box back in and hook up the main air intake tube and you are done with the right side. The left side is just like the right except there is no air cleaner box to remove so it will go faster.
There it is, a nice clean Castor Rod with new I.A.P. polyurethane bushings. New Steering Wheel!
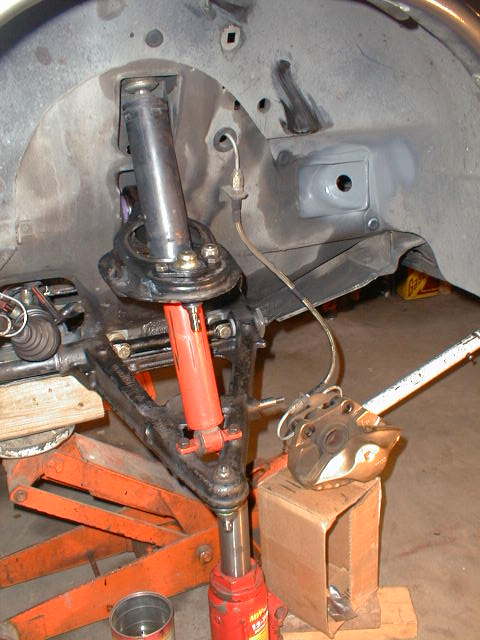
Super Verde did not come with a complete steering wheel assembly installed. There were a few things missing. My father called Vick to see what they had within his budget and the result of that conversation is what you see in the picture above. This steering wheel is a "Personal" brand wheel. It's a real leather wheel made in Italy. Personal makes some of the finest steering wheels out there and they are usually VERY expensive. They are very proud of the fact that 11 Formula One world championship cars use their steering wheels. Normally my dad would not be able to justify buying an expensive wheel, but VICK is selling these for $35! These wheels were made for some special type of boat. They are just like the automotive wheel except they say "Personal Marine" on them and are in that very boat like Grey color. I don't know how VICK ended up with them but they have a very limited supply. It's hard to explain just how high quality this wheel is. It does require an adapter but the whole unit is far superior to the stock Milano wheel. For example the turn signal canceling tabs are metal, not the plastic junk on the stock wheel. The horn button and contact are far better too and the wheel feels great. For all these advantages and the low price it was hard to pass up and the color grows on you. After looking at it a while I like it. More Suspension Work I installed stock Milano Verde torsion bars and rear coil springs on Super Verde and returned it too a near stock ride height. The previous set up was great for the track but not so great for my dad's long cross country trips. I set the ride height with 160 pounds in the driver's seat to simulate my father and got the front end left and right exactly the same to the millimeter. I have changed torsion bars and springs on these cars so many times I can do it pretty fast. While changing the rear springs I found that just about every bushing in the rear suspension is worn out. We planned to upgrade everything to polyurethane anyway so it's no problem. The car had a broken rear anti sway bar end link which is common on Milanos. I fixed that. More suspension work is needed, including bushings, shocks, ball joints and so on. I did take pictures of the spring and torsion bar removal procedure but I won't use space here for that since most would find it dull.
Here is Super Verde in my shop with its stock torsion bars and springs. The engine, and driveshaft are out. You can see my dad in front of the car inspecting the motor which is on an engine stand. The wheels on the car are beat up shop wheels. The correct Verde wheels are coming.
Here is the critical Lower "A" arm bushing. We completed Super Verde's front suspension by installing all new bushings and ball joints. We used IAP's polyurethane bushings when possible. The most critical bushings in the front suspension are the lower "A" arm bushings. These bushings take most of the suspension loads and they do wear out. When worn out they cause the lower "A" arms to move outboard causing excessive negative camber, so much that camber can't be set correctly with the stock range of adjustment. Worn lower "A" arm bushings also prevent the wheels from remaining in a consistent position. If your car shows different alignment specs every time you check it, these bushings are probably worn out. I won't go into much detail on how to change them since that's covered in the factory manual, but if you are doing torsion bar work it's probably a good time to do it since you have almost got the "A" arms off anyway. Once the arms are off you have to press out the old bushings and press in the new ones. You will need a serious shop press to do this
Here are the upper arm's inner bushings. The stock bushing is a one piece design, these bushings from IAP are a two piece design so they are easy to install. The upper suspension arm's inner bushings are critical if cornering is important to you. As these bushings compress in cornering the top of the outside tire can lean over causing the tire to lose some of its contact patch with the road. These stiffer polyurethane bushings compress less then the stock units and help keep the tire upright during cornering. Installing them is pretty straightforward. Use a ball joint separator and normal wrenches to remove the arm from the car and press out the old bushing. The new poly bushings are a two piece design so they can be pressed in by hand. However that means they can also come out very easily and once on the car they can and will actually back out about 1/4 of an inch. That's not enough to cause a real problem but it will reduce the bushing's effectiveness in securely locating the upper arm. Since Super Verde will have to perform with stock torsion bars and springs we can't afford to lose any performance anywhere else in the suspension so we used shims between the body of the car and the bushings to insure they don't back out at all.
My finger is touching on of the special shims we used to insure the upper inner bushings stay in place. Super Verde's power steering system needed a lot of work. The pump was old and the rack leaked. All the lines were due for replacement as well. All of these parts added up to a huge amount of money. At first we though about swapping in a GTV6 manual rack but my dad wanted the faster ratio of the Verde's power steering. As it turns out putting in a GTV6 rack would be way too much work anyway. The solution was to convert the standard power rack into a manual rack. After a discussion with the manufacturer to verify that our idea would work my dad proceeded with the modification and now it's done. By the way ZF says this is one of the best steering racks they ever made, even superior to the ones used in BMWs.
There it is, a manual fast ratio steering rack! To convert the rack to manual it must be removed, thoroughly cleaned and packed with grease. Use bolts and thread sealant to plug the holes and install two balance lines as shown in the picture. When you bolt it back in use liquid thread lock on the bolts securing it to the chassis. We never could find a good deal on stock shocks nor could we sell the Konis so they went back on the car. We also pulled the Castor rods back off the car to clean up their mounting holes and to rust proof them. So far the front suspension has All new ball joints, new lower "A" arm bushings and new poly upper inner and castor rod bushings. As soon as the new sway bar bushings are installed the front suspension will be done.
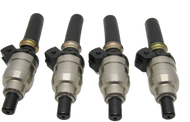
This front suspension is just about done, it just needs its Castor rod put back in and the sway bar put on. Note we cleaned up and rust proofed the castor rod's mounting area, that's a good idea. Engine Inspection! Super Verde's motor was a big question mark so my dad was anxious to pull it apart. We suspected a bad head gasket since it had all the right signs but the fact that two cylinders had no compression was an odd thing and the blown head gasket theory didn't quite explain that. Still it made more sense then any other single fault. It turns out the head gasket was fine. The problem was a pair of bad Bosch fuel injectors that had caused an extremely lean mixture in the two failed cylinders. This mixture burned so hot it caused serious piston damage. As bits of the pistons near the exhaust valves burned away they melted into the ring groves and onto the cylinder walls causing a total loss of compression. The two pistons themselves are destroyed. All metal between the top of the pistons and the first compression ring near the exhaust valve is gone. Well it's not really gone, it's just in other parts of the cylinder. The other 4 cylinders are in excellent shape, in fact they are amazingly good. The rest of the motor is excellent. The cooling system was a little clogged up and it had a broken spring in the timing belt tensioner but the belt had not skipped. It appears that the motor had frequent oil changes but never had it's cooling system flushed. Luckily there is no corrosion damage in the block or heads..
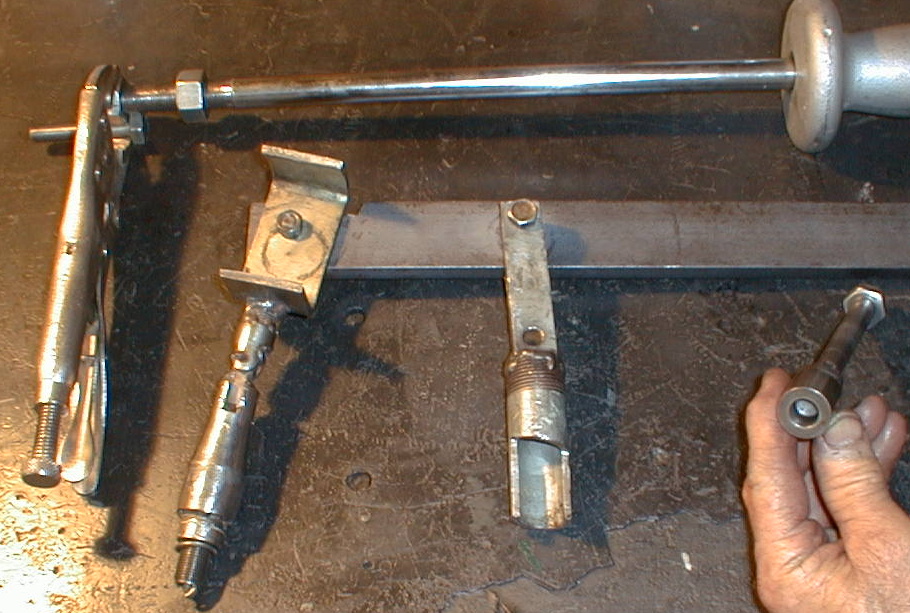
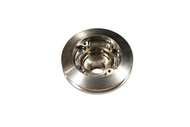
This damage was caused by a bad injector. A high quality forged piston probably would have survived but no cast piston would have stood a chance. Bad injectors and or bad lower injector seals are very serious and should be dealt with as soon as possible. All in all the motor is in great shape and will be excellent when rebuilt. It looks like we will turn this into an upgrade and install Venolia pistons. This is not the first time I have seen cast pistons fall apart when subjected to extremely harsh conditions and using a quality forged piston like Venolia gives extra protection against things like this. Cylinder Heads Super Verde's heads will be treated to a first rate valve job. We are using top quality Valve Guides, Valve Seals, Gaskets as well as all new exhaust valves. The valve seats will receive full radius cuts to improve flow and the springs will be the best we can find. Since this is a low budget project we are doing as much work as possible in our shop. For most people sending your heads to an Alfa specialist for a valve job is the best option. Most local shops will not have the Alfa V6 specific tools needed to do the work. They can still do it but the extra time it takes them will show up on your bill and it will not be worth it. However there is another good option that can save you quite a bit of money and result in a better head. You can save most of the labor cost by taking apart and assembling the heads yourself. In fact you can do everything yourself except installing and grinding valve seats and re-grinding the valves. These services will only cost about $100 at your local shop, add that to the cost of parts and suddenly a valve job is not so bad. Taking the heads apart is difficult but not impossible. It's explained well in the factory manual so I will not try to re-create that here. I will point out some of the problem areas and how we get around them. We use three special homemade tools. The first is used to get the rocker shaft out. It's a simple slide hammer, bolt and a pair of vice grips. Since one end of the rocker shaft is threaded you can screw a bolt into it. Then attach a slide hammer to the bolt with your handy Vice Grips and use the slide hammer to force the shaft out. This is an easy and safe way to remove this often stubborn part. It may look like you can remove plugs in the head at both ends of the rocker shaft and pound it out but DON'T do that. It can easily result in damage. The second homemade tool is a valve spring compressor. No valve spring compressor from Auto Zone will work on the Alfa V6's intake valves. That's because the intake valve springs are surrounded by the structure of the head. All is not lost it's possible to use a normal "C" clamp style compressor and a socket with one side cut out. Put the socket between the compressor and the valve retainer and that will give the compressor enough reach to compress the valve spring. The cutout in the socket will enable you to remove the valve keepers and take it apart. We have gone one step further and made our own valve spring compressor. It make the job a lot easier and if you plan to do more then one engine it's worth the time to make. The third tool is used to install the new valve guides. Valve guides are easy to pound in if you freeze them first. However you must have a tool that fits the shoulder of the guide so you don't damage anything. A simple cylinder the correct diameter with a bolt threaded into it does the job perfectly. Just be careful to pound them in the correct distance because you can't take them back out without causing damage to the guide.
Here are the three special tools we use to overhaul an Alfa V6 head. The top one is the bolt/slide hammer used to remove the rocker shaft. The second one is our valve spring compressor. The third one in my dad's hand is used to drive in new Valve guides.
Here are two of the guides we removed. The guide on the left is an exhaust guide and the other is an intake. Don't get these mixed up, they don't interchange! The exhaust guide in this picture is the later Steel guide. These should be removed and destroyed.
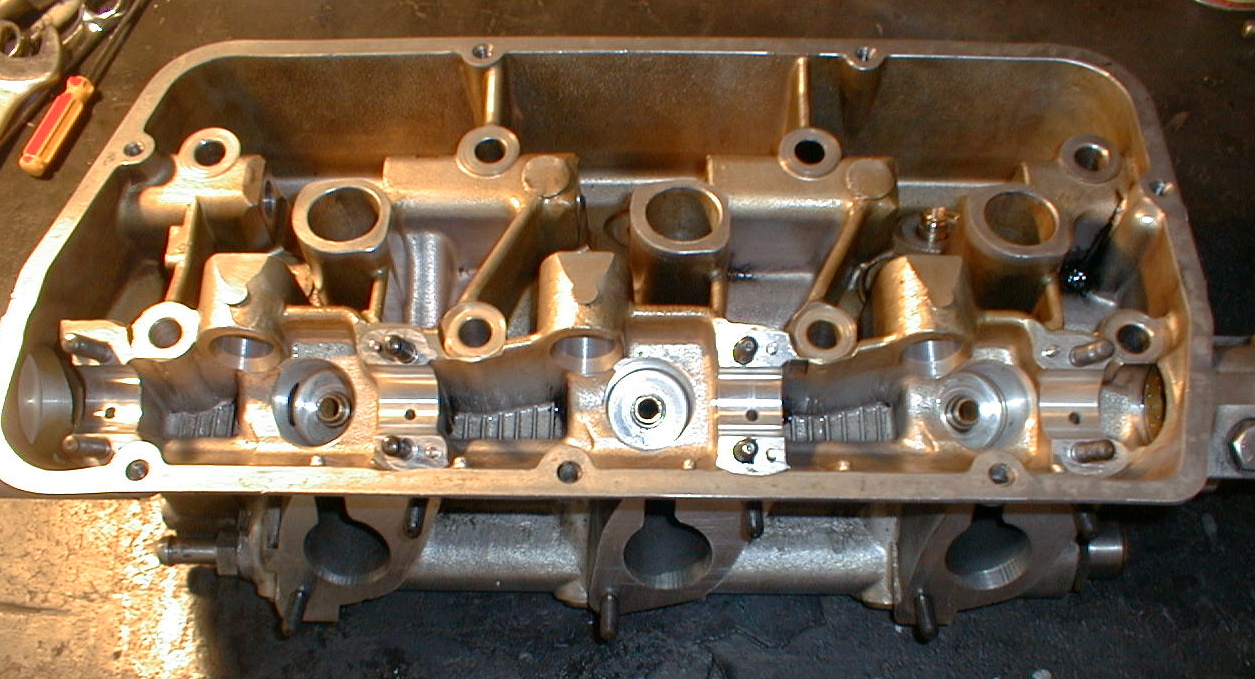
Here is the head ready to go to the machine shop. It's clean, fully disassembled and has all new Valve Guides. All we will have the machine shop do is install new exhaust valve seats, grind them and re-grind the intake valves and seats. Picking a good machine shop can be tricky. One good way to start your search is to ask the local SCCA racers who they recommend. I only use shops where I can talk to the person who will actually do the work. At some shops you walk in and there is a receptionist who takes the head, gives you a form and says come back and get it in a week. That's not a good sign. I also like to look around the shop and look at some completed heads. A few things are important to explain to the person who will be performing the work. First of all tell them you want as LITTLE metal as possible removed from the surfaces of the valves and seats. The more you remove the deeper the valve moves into the head and that hurts performance. Tell him you want full radius cut seats, if he says they can't do that and offer you a 3 angle job instead that means they don't have equipment modern enough to do the best job and you should probably go elsewhere. Pay attention to the person's reactions when you say you want as little metal removed as possible and full radius cut seats. You may be able to tell if the person really cares about your head or is just listening and plans to do whatever he usually does once you leave. The full radius cut seats are important. They improve flow and thus horsepower on a stock motor with even greater gains on a modified motor. This mod is inexpensive and has no drawbacks. It will really help Super Verde breath. This is actually the only performance mod we are doing to the head. We are not enlarging the ports or using bigger valves. All other mods are reliability mods. Parts Needed Obviously you will need a gasket set. Some are a lot better then others. You can view my pictures below to see the difference. You will also need Valve Seals and Valve Guides. You may need Valve Springs, intake and exhaust valves and seats. If you have a later model engine with steel exhaust valve guides you WILL need all new exhaust valves. More on that later. I will list the parts I chose and explain why I chose them over others. Lets start with the Valve Guides. The factory guides are bronze and they suck, there is no other way to put it. During the first few years of production these engine developed a reputation for wearing out exhaust valve guides. The factory's valve guides were not durable and the engine's efficient head and exhaust port blasts these guides with a lot of high velocity hot gases especially at full throttle. The stock guides just didn't hold up. At some point during production the factory addressed this problem with a fix. The factory fix was to replace the Bronze guides with STEEL guides on the exhaust side only. This did correct the problem from the factory's point of view but it creates more problems for us. It turns out that the Steel guides don't wear out, instead they wear out the valve stem. Now the valve stem wears out a lot slower then the old style bronze exhaust valve guides so from the factory's point of view the problem was solved. From my point of view, now when I overhaul an engine with steel exhaust valve guides not only do I have to buy new guides but I have to buy all new exhaust valves, and they are expensive! There is another problem with the steels guides. In extreme performance applications at high cylinder head temperatures it's possible for them to cause the valve to seize! This causes total instant destruction of the motor. I know of one case where this happened on a super high output 2.5. You can probably guess from what I just said that we won't be using stock guides on the Super Verde. We are using Manganese Bronze Valve Guides from IAP. These guides along with Teflon seals will last a long time (We are expecting 200,000 miles), reduce oil consumption and should hold up to the high temperatures supercharging can create. I don't know of a better valve guide and they are not too expensive, less then $5 each at the time of this writing.. https://centerlinealfa.com/catalog/valve-guide-ex-v-6 The last key parts in Super Verde's heads are the valves springs. The factory's springs are fine, there is nothing wrong with them. However valve springs should be replaced so why not upgrade? The stock valve springs are good to about 7000 rpm, closer to 7400 when new. However an engine with really hot cams, high compression and so on could reach 8000 rpm or more. For engines like this it's best to go with ISKY valve springs. Isky makes a double spring with a middle damper for high rpm stability (it looks like a triple spring). These things will insure your valves close at just about any rpm level. The problem is if you are not building an 8000 rpm motor the extra spring tension will rob horsepower and cause faster wear on your expensive camshafts and the rest of your valve system. Super Verde's engine will be a 6500 rpm SUPERCHARGED motor. It doesn't need extra stiff valve springs, it just needs extra good valve springs. Like so many other parts, Super Verde's springs are coming from IAP. Their High-Rev valve spring are about the same as the stock springs however they are all checked electrically for defects. The manufacturer flows current through them to check for flaws that could show up as a broken spring years later. Since I have had a stock valve spring break on a Fiat this little extra bit of insurance is exactly what I am looking for. They will work well for rpm levels below 7500 without robbing any power or causing accelerated wear. We got the heads back from the machine shop and put them together. That's a straightforward process. We did hand lap the valves in to insure a perfect seal. Hand lapping is a process that most machine shops don't do any more because it takes time and they assume it's not necessary since they ground the valves and the seats and the two machined surfaces should mate perfectly. However I strongly suggest that you insist they do it or do it yourself. Hand lapping is easy, buy some valve grinding compound from any auto parts store. It's a thick liquid with abrasive properties, you simply put it on the valve seat and spin the valve by hand grinding the valve into the valve seat. Grinding is too strong a word since this doesn't really remove metal it just sort of smooths the two surfaces together. This helps the valve mate to the seat and leaves a visible pattern on the valve and seat you can see. That pattern should be a thin uniform circle made from a line about 2mm thick or less. If the line varies in thickness then something is wrong and the machine shop will need to re-machine those surfaces. If it's uniform in thickness all the way around but greater then 2mm your seat pressure will not be high enough to withstand serious performance use. Once you are done, clean off all the valve grinding compound and put the head together. Engine Bottom End The bottom end of Super Verde's 3.0 will be fairly standard. That means stock except for special pistons, bore size and very precise balancing. It won't have a knife edged crank, special rods or anything exotic. The Alfa's stock bottom end is excellent and those exotic mods are very expensive. We also have one big change, this will be a NON INTERFERENCE motor. That's right, if the timing belt breaks it won't bend the valves! We obviously needed new pistons since two of the original cast pistons were destroyed. We wanted lower compression and had a few options. We could have bought a new set of pistons and liners, and cut the tops off the new stock 9.5:1 pistons but that weakens them and scares me a little. Or we could have bought a new set thrown out the pistons and then had custom pistons made. (you can't buy just liners). We decided to have a set of custom pistons made and have the stock liners bored out. They only needed to be bored .005" to be made round again but we went with .010 because it's an easy number to work with and not likely to be added incorrectly.. If you take an Alfa block with liners to a machine shop they will likely say they can't bore it because there is nothing to keep the liners from spinning in the block. Well, that's not a problem. Make hold downs to keep them in place and they can bore it just like they do a 350 Chevy.
Here is the block with our special hold downs which enables the local machine shop to bore out the liners.
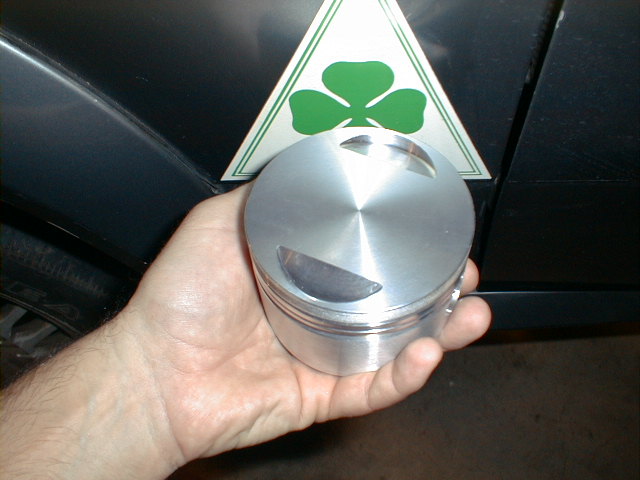
Here is something you haven't seen before, it's a NON interference piston. Since the "Super" in Super Verde stands for Supercharged we wanted to go with a little less compression to allow for some extra boost. It's not too low, just 8.8:1. This is low enough to use some serious boost if we need to or just keep it as a mildly boosted reliable motor which is our plan. It's also high enough so the motor will perform well even without the supercharger. These pistons are very special, they have custom ring grooves to allow the use of piston rings that can stand up to nearly any amount of boost. They also have extra large and deep valve cutouts which allow the use of over sized valves and or very high lift camshafts (neither of which this car will have). The deep valve cutouts also make it a non interference engine meaning that if the timing belt slips or breaks, the valves can't hit the pistons. Car's first drive. My dad got the motor together and installed it along with the original 3.55 transaxle rebuilt with the usual parts, syncros, sleeves, etc. The car started and drove almost perfectly with one MAJOR flaw. It used oil like crazy! I don't mean a little oil, I mean A LOT, like a quart every 50 miles. The car left a cloud of smoke on every start up, smoked constantly and left a smoke screen behind when driven at full throttle.
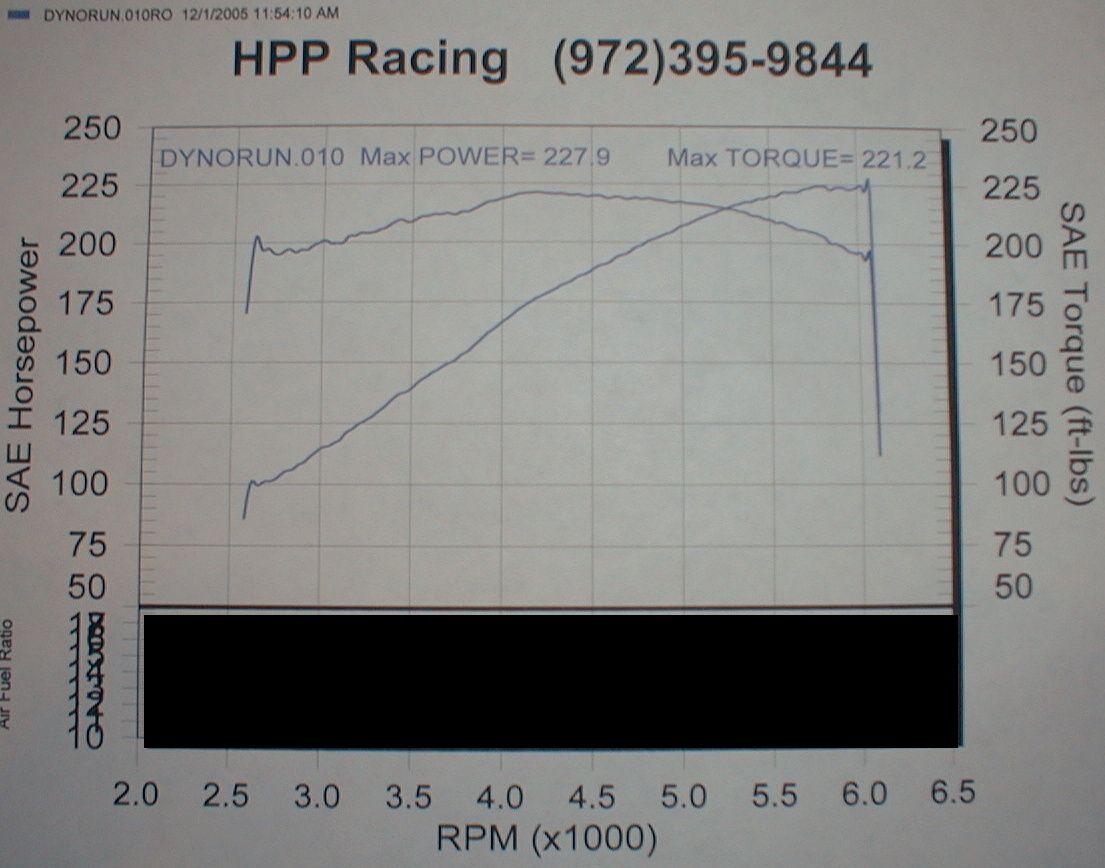
SuperVerde's non supercharged setup. We suspected the piston design. We figured since that was the only major change to the factory's design it couldn't be anything else. After some talk with Venolia and Total Seal we concluded that it was probably a valve guide problem and my dad pulled the heads and took them apart. Both Venolia and Total Seal assured us they make pistons with this strange set up all the time and it could not be a factor with the oil consumption. So, my dad pulled apart the heads. Sure enough there were minor issues with the heads. The valve guides did not have the ridges in them needed to keep the seals from floating up off the guides. This didn't seem like a big deal when we put the motor together but in light of the oil consumption we thought this may be the problem. We had the proper ridges machined into the guides and put the heads back together. Important Note: These ridges are important. International Auto Parts has the correct guides with the ridges in them. When we told them about this they actually checked all of their guides and sent the ones without ridges to be machined! That's serious quality assurance. Well, the motor went back together and...it still burned oil like crazy. Not as much, probably about a quart in 150 miles, still way too much. The motor came apart TWO more times before we got this problem nailed down. Nobody had any idea why it used so much oil. The problem turned out to be a combination of pistons and piston ring design. SuperVerde now has 8.8:1 forged Venolias with Total Seal rings, however it's not the same setup we had in the motor when we first started it. If you wish to order non interference pistons and rings for a 3.0 Alfa the order numbers for the parts that work will be on the secret tech page (not up yet). Now that the car's oil consumption was normal and it didn't leave a smoke screen my dad took it on a few drives. The motor ran very well even though at this point it didn't have its supercharger. With its good intake system and exhaust it put out about 150 horsepower at the wheels and was very smooth up to my dad's self imposed 6000 rpm redline. The rev limiter is set at 6800 on this car. It wasn't long before it was time to put on the supercharger. After all the "Super" in SuperVerde is for the supercharger. At first we had to run it with very low boost because we didn't have the needed Stage 2 fuel injectors. This means although the supercharger was on the car it did very little for horsepower. Once we got the injectors we installed them and bumped boost up a couple times eventually to its current 7 psi configuration. My dad has driven the car with the supercharger about 25,000 miles. It's been very reliable and has proven itself by running on California's 91 octane fuel. We even ran 89 octane with 5 pounds of boost and never had a problem. With the 7 pound boost setup the car is wild. It can break it's rear tires loose at 50+ mph and get sideways. It's probably near the safe limits of the transaxle and driveline. It's dyno results show 228 REAR WHEEL horsepower, which is about 279 flywheel horsepower using the commonly accepted figure of 18% driveline loss. Best of all the car looks dead stock. It even has a single stock sized tail pipe coming out the back in the stock location. It's quite a sleeper!
The Dyno Chart. Notice torque is strong at all RPM. SuperVerde's power comes on strong down low! Also, remember this car is no dyno queen, it travels about 30,000 miles a year! I am very proud of this car and the work my dad and I did on it. Well, mostly my dad. I did some of the suspension work, like the ride height and I did the supercharging work. However my dad fine tuned the supercharger in all his driving to the point that it's now OEM smooth, powerful, and reliable. I also think this is probably the most powerful pump gas L-Jetronic Verde on the planet. Certainly the most powerful matching number L-Jet Verde ( proving I didn't blow up 5 motors getting it to this point ). Everything on this motor is stock except for the custom pistons and rings.
The picture above shows SuperVerde's supercharged motor. The current set up is slightly different, but this picture gives you the basic idea. |
This page is quite old (pictures and text are from 2006!) and some of the information is now obsolete. However, a lot of the information is still good so this page has been resurrected. I may make some changes to bring it up to date.